You can force one pair of boots into four seasons, every terrain, and all pack weights. You’ll just be compromising constantly — sweating through summer slogs or under-supported in shoulder-season mud with a heavy pack.
Why One Pair of Boots Can’t Do Everything Well
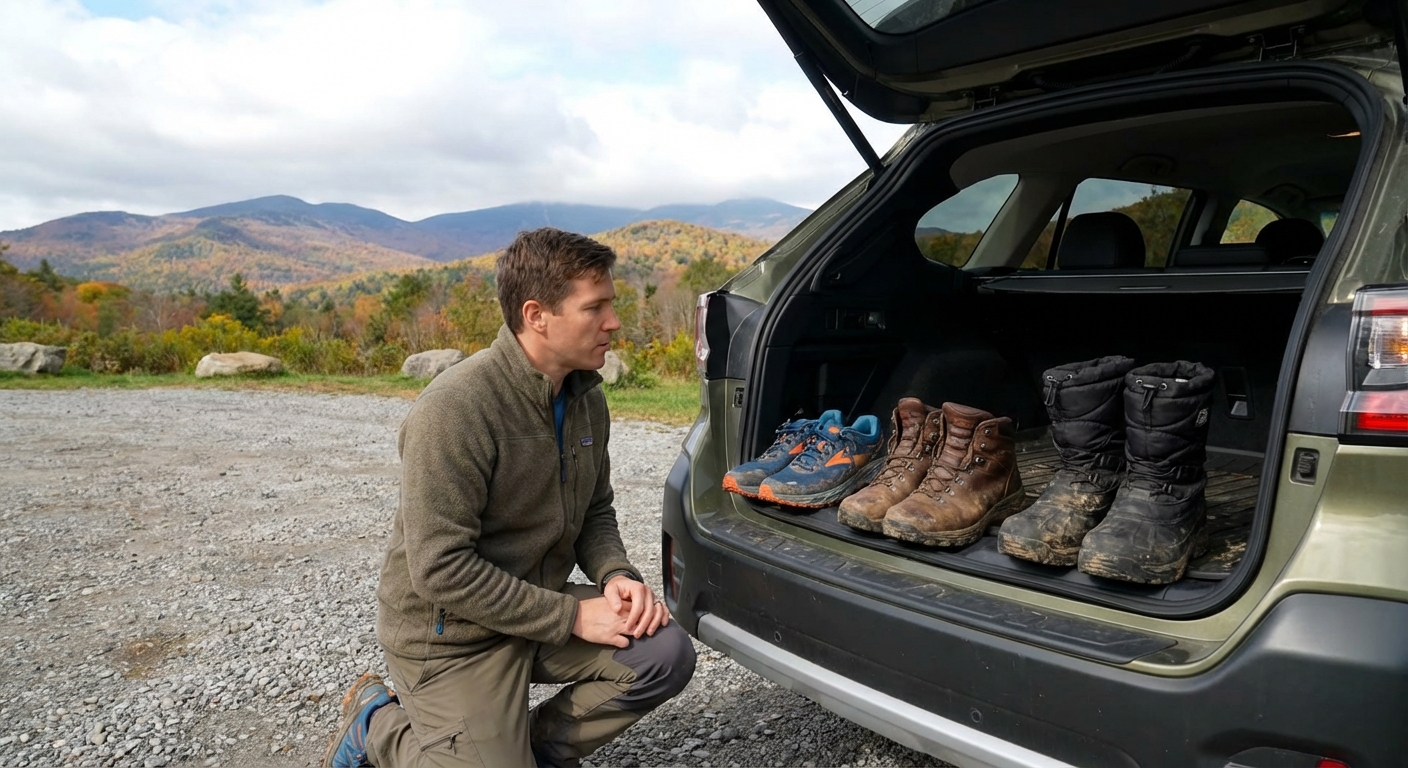
Serious hikers and backpackers often end up with a three-boot quiver: a lean, efficient setup that covers almost everything without a closet full of redundant gear.
Here’s how to build that lineup with real-world, field-tested examples.
Boot Slot #1: The Lightweight Daily Driver
This is the boot (or shoe) you reach for most often:
- Day hikes
- Quick overnights
- Shoulder-season walks on good trail
What It Needs to Do
- Keep fatigue low
- Handle light to moderate packs (under ~25–30 lb)
- Dry quickly and breathe reasonably well
- Be comfortable enough that you want to hike more
Weight and Construction Targets
- Weight: under 2.2 lb/pair (ideally 1.6–2.0 lb)
- Upper: mostly synthetic or light leather + fabric
- Sole: moderately aggressive lugs, flexible forefoot
Recommended Options
- Salomon X Ultra 4 Mid GTX or non-GTX
Great for mixed terrain and wet conditions. The non-GTX version is ideal for dry climates.
- HOKA Anacapa Mid GTX
Cushy, rockered, easy on joints. Better for trail miles than talus hopping.
- Altra Lone Peak All-Wthr Mid
For hikers who want trail-runner feel with a bit more coverage.
Budget Pick
- Merrell Moab 3 Mid
Not the lightest or toughest, but comfortable and affordable. Ideal if you’re just starting to build the quiver.
Boot Slot #2: The Solid Backpacking Boot
This is your workhorse for:
- 2–7 day backpacking trips
- Heavier loads (30–45 lb)
- Mixed trails with extended rocky or rooty sections
What It Needs to Do
- Deliver real underfoot support and torsional stiffness
- Offer enough ankle structure without feeling like ski boots
- Provide decent weather resistance for shoulder seasons
Weight and Construction Targets
- Weight: 2.2–3.0 lb/pair
- Upper: robust leather/synthetic mix or lighter full-grain leather
- Sole: stiffer midsole, deep lugs, quality rubber (Vibram or equivalent)
Recommended Options
- Lowa Renegade GTX Mid
The quintessential backpacking boot: comfortable, capable, and proven for loads in the 30–40 lb range.
- Scarpa Zodiac Plus GTX
Edges well on rock, stable under load, and handles rougher alpine-style trails.
- Salewa Mountain Trainer Lite Mid GTX
Secure fit, approach-shoe DNA, serious grip on rock and wet slabs.
Premium Option
- Hanwag Tatra II GTX
For hikers who want traditional Euro boot security with reasonable walkability.
Boot Slot #3: The Tank (Bad Weather and Rough Terrain Specialist)
This is the boot you pull out when conditions or objectives get ugly:
- Heavy winter or shoulder-season loads
- Off-trail navigation, scree, talus, and bushwhacking
- Snow travel, mud seasons, and rough approach routes
What It Needs to Do
- Protect shins, ankles, and feet from real abuse
- Hold an edge on sidehills and firmer snow
- Resist getting torn up by rock and brush
- Stay solid when pushing crampons or microspikes
Weight and Construction Targets
- Weight: 3.0+ lb/pair
- Upper: full-grain leather with big randing or armored synthetics
- Sole: stiff or semi-stiff, tall lugs, resoleable where possible
Recommended Options
- Zamberlan Vioz GTX
Long-distance, heavy-load brute with real ankle and underfoot support.
- Asolo TPS 520 / Power Matic series
Guide-grade, load-hauling boots that take a beating.
- Scarpa Kinesis Pro or equivalent heavy hikers
For when your route resembles a low-grade mountaineering trip.
Weight vs. Overlap: Avoid Redundancy
A smart three-boot quiver avoids cluttered overlap:
- If your daily driver is already quite supportive (e.g., X Ultra 4 Mid), your backpacking boot should step up stiffness, not just add 3 oz.
- If you buy a truly burly leather tank, don’t also buy a slightly lighter boot that’s barely different; you’ll just ignore one pair.
Think in distinct jumps:
Light + flexible
Medium support, mixed use
Heavy + stiff for abuse
Each pair should clearly beat the one below it only when the terrain or load demands it.
Price Tiers and Where to Spend
You don’t have to go top-shelf on all three slots.
Minimum Spend Strategy
- Daily driver: Midrange (~$140–$190). It sees the most miles; don’t cheap out completely.
- Backpacking boot: Mid to high (~$180–$260). Worth paying for real support.
- Tank: High (~$250–$350+) if you really need it. Otherwise, skip the category.
If your hiking is mostly fair weather on trails, consider a two-boot quiver:
Light daily driver
Solid backpacking boot that doubles as your “bad weather” option
Only add the tank-style boot if your trips and terrain justify it.
Durability Expectations by Slot
Realistic mileage ranges (depending heavily on terrain and load):
- Daily driver: 300–800 miles
Softer, lighter builds; expect to replace more often.
- Backpacking boot: 600–1000 miles
Beefier midsole and uppers; may last several seasons of trips.
- Tank: 800–1500+ miles
Often resoleable; long-term investments for heavy users.
Rotate boots to allow midsoles to rebound and linings to dry fully between trips. This alone adds life.
Seasonal Use: When Each Boot Earns Its Spot
Summer:
- Hot, dry trails → Daily driver (maybe non-Gore‑Tex)
- Alpine scrambles and snow patches → Backpacking boot or Tank, depending on stiffness requirements
- Mixed weather, mud, some snow → Backpacking boot as your default
- Multi-day off-trail hunts or rough routes → Tank
- Short, cold day hikes on packed trails → Insulated or waterproof daily driver with gaiters
- Snowshoeing, heavy winter packs → Tank with good insulation and room for thicker socks
Shoulder Seasons (spring/fall):
Winter:
You don’t need insulated boots for all winter hiking — solid leather boots plus appropriate socks and gaiters often cover most needs.
Care Strategy for a Multi-Boot Setup
Owning more than one boot doesn’t mean more work; it just spreads wear.
Shared Basics
- Clean after muddy or dusty trips. Dirt is abrasive, dust dries materials.
- Air-dry slowly. No radiators, fires, or dashboards.
- Check laces and hooks. Replace laces before they fail on trips.
Slot-Specific Care
- Daily driver:
- Expect to replace more often; don’t waste expensive treatments.
- Keep them clean and dry; refresh DWR as needed.
- Backpacking boot:
- Maintain waterproofing carefully; you depend on these for longer trips.
- Condition leather parts lightly.
- Tank:
- Treat leather religiously.
- Consider resoling instead of replacing when tread is gone but structure is good.
Footwork: Adapting Your Stride to Each Boot
Each boot class rewards slightly different technique:
- Light boot/shoe: Shorter, quicker steps; let the foam and flexibility do their work.
- Backpacking boot: Firm, deliberate placements; let the boot support and protect.
- Tank: Use the stiffness. Kick steps in snow, edge solidly on sidehills, plant your weight with confidence.
Switching between boots with a bit of awareness improves stability and reduces fatigue.
Building Your Quiver Over Time
You don’t need to buy three pairs at once.
A smart progression:
- Start with a solid daily driver. Learn what you like.
- Add a real backpacking boot once you commit to multi-day trips.
- Decide if you truly need a tank after you’ve done a season of shoulder-season or off-trail trips.
Buy intentionally, hike a lot, and adjust the lineup as your trails and ambitions change.
The goal isn’t collecting boots; it’s having the right tool ready so you never have to say, “I’d go on that trip if I had the right footwear.”